Node (or NodeJS) can be installed quite easily on the three popular OSes (macOS, Linux, and Windows). You can simply go to https://nodejs.org and download the appropriate binary installer for your platform.
For Windows users, the most straightforward way to get Node is probably via the binary installer. All that’s involved is downloading the installer from https://nodejs.org, double click on the installer, and following the prompts.
For you Linux and macOS users, you can use your package managers, e.g., aptitude, yum, arch, or brew, to install NodeJS. The official NodeJS site keeps updated documentation on how to install Node using package managers; here https://nodejs.org/en/download/package-manager/.
Before you can install Node via NVM, you first have to install NVM. Installing it is simple; you simply need to download a script file and run it on a terminal, like this
Before you run the command above, make sure that the curl utility is installed on your system.
After NVM has successfully installed, you can now install NodeJS, like this.
nvm install node
I trust that with all these options, you should be able to install Node on your system. To test if Node is working correctly, run the following commands on a terminal or a cmd window.
node --version
npm --version
NPM (Node Package Manager), a critical part of the Node ecosystem, is installed with the Node executables.
Node has an interactive environment (REPL), which you can use to play around with Node and JavaScript interactively, but we won’t cover that here. Instead, we’ll go straight to running NodeJS programs.
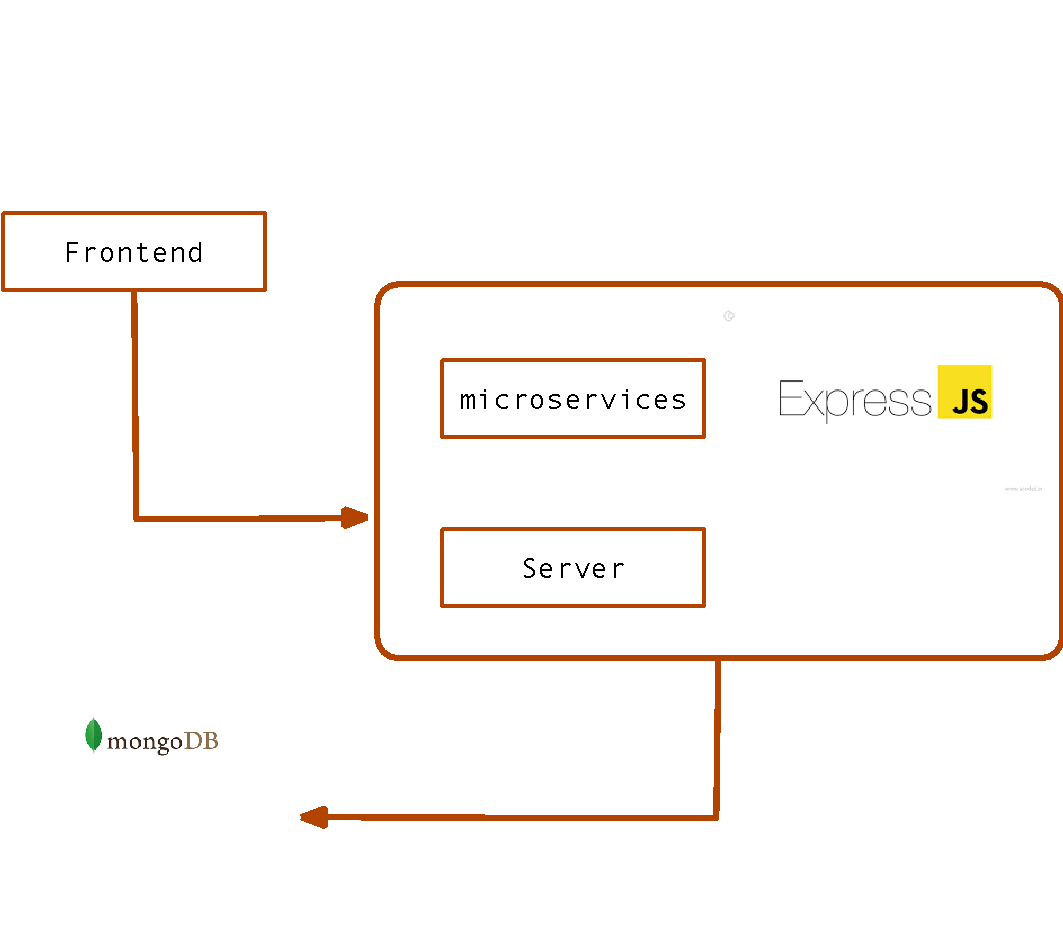
The Node platform is comprised of (generally) three things;
V8 Engine (from Google). The same JavaScript engine that powers Chrome and other Chromium browsers like Opera, Vivaldi, Brave, and Microsoft Edge
libuv (Unicorn Velociraptor Library). An opensource project is written in multiplatform C. It provides support for I/O based on event-loops. This is responsible for the asynchronous capabilities of NodeJS
Core libraries. These are the built-in libraries of Node. Some of the included libraries are used for assertions, DNS lookups, HTTP, file compressions, etc.
To write a Node program, simply create a JavaScript source file, write your program and then run it by passing it as an argument to the node runtime. Create a hello.js file and modify it to match the code listing below.
setTimeout(()=< {
console.log(“Hello”)
}, 2000)
console.log(“World)
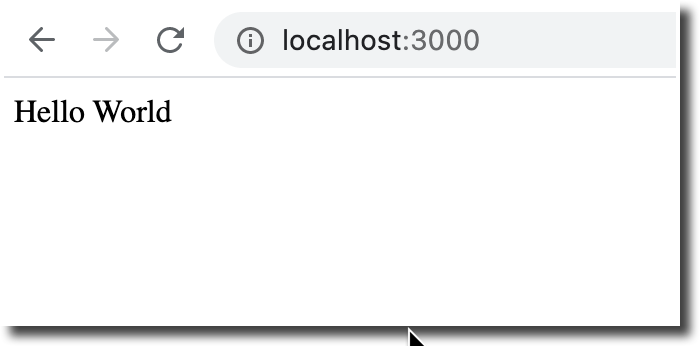
Now, let’s run it. On a terminal or cmd window, run the following
node hello.js
If everything went well, you should have seen the following;
Node is different from its server-side counterparts because it’s very close to the metal. It’s different from Java, C#, or PHP in relation to a web server.
Typically, you’d create a serverside app (using Java, C#, or PhP), then you will deploy that app to a server, whether that be Tomcat, Apache, or NGINX. In Node, there is no server. Node itself is the server.
Let’s take the Hello World example of NodeJS. Modify our hello.js example (previously) to match the following code listing.
server.listen(port, hostname, () => { console.log(`Server running at http://${hostname}:${port}/`) })
The example above is from the official web page of NodeJS. For quite some time in the past, this code was front and center on the NodeJS site. Let’s walk through the code.
The first line, which reads
const http = require('http')
means we’re getting the http library — this isn’t readily available for Node programs, so we have to require it—and we’re assigning it to a variable (which is also) named http; we can name the variable something else, it’s not required that it’s the same name as the library, but in this case, it is.
By the way, the variable was declared as a const, which effectively makes it a constant — we won’t be able to re-assign any value to it later on.
The second and third lines, which reads
const hostname = '127.0.0.1'
const port = 3000
are merely assigning values to the hostname and port constants.
is the meat and potatoes of this small server-side app. The createServer() function of the http object takes a callback function as an argument, which will be called every time a client (an http agent, like a browser, for example) tries to connect to this server.
The callback function takes two arguments, the HTTP request, and response objects. These arguments are passed by the runtime when the function is called. The three lines inside the createServer() are explained below.
res.statusCode = 200; – We’d like to set the status code of the response object to 200, which means the HTTP request is a success. You can find the listing of HTTP response status codes in the HTTP RFC 7231 (Hypertext transfer protocols, semantics, and content) https://tools.ietf.org/html/rfc7231. You can find a less terse explanation of the codes here https://developer.mozilla.org/en-US/docs/Web/HTTP/Status
res.setHeader(‘Content-Type’, ‘text/plain’); – We’re setting the header of our response
res.end(‘Hello World’); – Finally, we’re sending textual data via the response object.
The last block of the sample code, which reads
server.listen(port, hostname, () => {
  console.log(`Server running at http://${hostname}:${port}/`)
});
starts the server and listens on port 3000; The third argument of the listen() function isn’t really necessary, but many developers put it anyway because it serves as a status to the server that it’s up and running.
If you want to test this code, edit our hello.js example earlier to match our web server sample code; then, run the following command on a terminal window.
As you can see, with some minimal codes, we can already build a very basic web service API. The request and response objects of Node is the cornerstone of all web applications.
We can get really clever with these objects and create a very sophisticated web app; but that would mean writing a whole bunch of routing logic for the various HTTP methods (GET, POST, DELETE, PUT, etc.).
It’s better to do those things with ExpressJS, which is our next stop.
ExpressJS
ExpressJS, or simply Express, is a minimal and flexible web application framework. Many developers use it to organize their apps into an MVC-like structure (Model View Controller) or to create RESTful APIs.
Let’s re-write the hello.js example, which we coded from earlier. Modify it to match the following
app.listen(port, ()=> { console.log('app listening on port ${port}'); })
Let’s walk through the codes. The first line which reads
const express = require('express')
Makes the express library available to our app. Notice that I didn’t import the http library anymore. Express abstracts away a lot of things from our earlier code.
Replaces the createServer() function (from earlier). The get() function above effectively establishes a route to our app’s document root and responds by sending the “Hello World” text back to whoever makes the request.
Before you can test this code, you need to pull the express library from the NPM repos. From a terminal or a cmd window, type the following.
npm init -y
npm install express --save
The first line initializes the current project directory by creating a package.json file. The second line pulls the express library from NPM repos and saves the entry to the package.json file; this is useful because if you want other programmers to download your project, they don’t have to download all the libraries you used.
They only need to download the source files and the package.json file. To reconstitute the libraries, they only need to execute the following command
npm install
After that, all the libraries you used for the project will be pulled from the repos.
Going back to the project, now you can run our new program that uses Express.
node hello.js
There’s not much change in the output. It still shows the uninspired “Hello World” screen,
Establishing Routes
Express has methods that correspond to all HTTP methods; as you might imagine, there is a post(), put(), delete(), as well as a get() method. These verbs make it fairly simple to write RESTful endpoints. The following code, for example
app.get('/employee', (req, res)=> {
  res.send('a list of employees')
})
will respond to an HTTP GET request at http://domain.com/employee, at the moment, we’re simply returning a String that says “a list of employees” — but that’s just a placeholder for an actual list of employees that we’ll build later.
The code above will respond to a GET request which accepts a route parameter. It will respond to a request like this http://domain.com/employee/001, where 001 is an employee ID.
Route parameters are specified by placing a colon to the left of the parameter name. To get the value of the route parameter, use the request object’s params property, like this
let bookid = req.params.id;
The DELETE operation is similar to the GET operation; we can write it like this
app.delete('/employee/:id', (req, res)=> {
  res.send('deleted an employee')
})
The code above will respond to an HTTP DELETE request. Like in the previous example, we are accepting a route parameter as part of the path. We will use that parameter to determine which records to delete in the database.
In the previous section, we dealt with the READ operation; now, let’s deal with CREATE and UPDATE operations.
app.post('/employee', (req, res)=> {
  res.send('added an employee')
})
app.put('/employee', (req,res)=> {
  res.send('updated an employee')
})
The code listings above will handle POST and PUT requests, which corresponds to RESTful CREATE and UPDATE operations, respectively. The idea is for a frontend app to pass a JSON object that contains an employee record to these endpoints.
The HTTP POST and PUT methods are unlike the GET and DELETE methods; we won’t be able to use the request object to extract the form payload straightforwardly.
If you try to work with form data without the help of any library, you’ll need to write some code that will deal with Streams — we don’t want to do that right now. We want it quick and easy.
To process form data, we will use the body-parser library; so, let’s add it to our project. On a terminal window, run the following command
npm install body-parser --save
To use the library in our project, we have to require it, then initialize it using the following codes.
After that, we can now use it inside the post() method.
app.post('/employee', (req, res)=>{

  let name = req.body.name;
  let email = req.body.email;

  res.json(‘added an employee’);
});
You need to make sure that the form’s HTML input elements are consistent with name and email, as shown in the example code above. The name of the form elements becomes the properties of the request.body object.
CORS
When you’re building microservices, you need to deal with the Single-Origin Policy of HTTP. Since we’re making an API, we have to assume that the consumers won’t be part of our domain. We have to allow Cross-Origin-Resource-Sharing (CORS).
To enable CORS in express, we’ll add the CORS library to our project; like so
npm install cors --save
Then, to use it, we’ll add the following code to server.js
const cors = require(‘cors’);
app.use(cors());
Our Express App
Below is the code listing of our Express app, as it stands right now. Of course, it’s not complete. We have yet to put the database handling codes, but it’s a good idea to take stock of what we currently have.
It’s also a good idea to test it as it stands to make sure that the route works. You can test the routes using the Postman tool (https://www.postman.com/downloads/).
let employeeTemp = { name : req.body.name, email: req.body.email }
console.log(employeeTemp)
res.send('added an employee') })
app.delete('/employee/:id', (req, res)=> { res.send('deleted an employee') })
app.put('/employee', (req,res)=> { res.send('updated an employee') })
app.listen(port, ()=> { console.log(`app listening on port ${port}`); })
MongoDB
Let’s move over to the database stack.
MongoDB is a NoSQL database; NoSQL (aka “not only SQL”) databases are different from their relational counterparts with respect to how to they store data.
In NoSQL, you don’t need a schema — well, not strictly, at least. NoSQL databases come in a variety of types based on their data model. Some of the types are document, key-value, wide-column, and graph. MongoDB uses documents as its data type.
If you’re new to NoSQL, the table below shows a comparison of relational database terminologies and their MongoDB counterparts.
SQL
MongoDB
database
database
table
collection
row
document
column
field
index
index
table joins
embedded documents and linking
A document in MongoDB is essentially a JSON object.
You’d want to install the Community Edition for the purposes of following this tutorial; the Community Edition is offered at no cost while the Enterprise edition is a paid option.
Download the installer from the MongoDB website (link is given above)
Choose either Linux or macOS
Pay attention to the version dropdown list. If you are on Linux, there are a couple of choices on the dropdown list. Do not be so quick to hit the download button. Make sure that your Linux distro is the one selected on the dropdown
Use the tar archiver tool to expand the downloaded installer — tar -xzvfMongoDBb-xxxx-x86_64xxx.tar.gz
Put the expanded folder in a directory where you have read, write, and execute privileges, and then include the folder in your system path.
set MONGO_HOME=/path/where/you/extracted/mongo/installer
set PATH=$MONGO_HOME/bin:$PATH
You can add the codes above to your startup login script (~/.bashrc for Linux and ~/.bash_profile for macOS).
Once the mongo tools are in your path, we can now create the database directory foMongoDBdb. On a terminal window, type the following command
sudo mkdir /data/db
sudo chown `id -u` /data/db
The first line in the example code above creates the database file for MongoDB. WhenMongoDBb starts, it looks for the database files in /data/db folder.
The second line changes the ownership of the /data/db file. The `id -u` evaluates to the currently logged in user (which is us).
Now, we can start the mongo server. Launch another terminal window, and type
mongod
This is a server process. The terminal won’t come back to the prompt while the server is running.
To terminate the mongod server, simply press CTRL+C.
Windows
The Windows installer comes either as an msi or zipped file. If you’re more familiar with msi installers, choose that one.
If you download the zip file, then the process of installation will be similar to macOS or Linux (as shown in the previous section). That also means you need to update the system path of Windows to include the MongoDB folder.
I will assume you went for the msi option. Double click the installer, like you would any other Windows app installer; then follow the prompts.
If you accepted the default installation folder, mongo would have been installed at C:\Program Files\MongoDB\Server\x.x\
Let’s create the database directory. Launch a cmd window (with Administrative privileges) and type the following
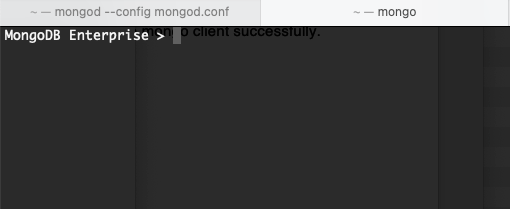
Now that the mongo server is up and running, we can connect to it. On Linux or macOS, launch another terminal window and type the following command
mongo
On Windows, launch another cmd window and type the following
C:\Program Files\MongoDB\Server\x.x\bin\mongo.exe
You should see the chevon prompt of MongoDB after launching the mongo client successfully.
Basic Operations
To list all databases, use the command
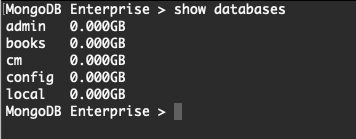
> show databases
As you can see, I’ve already got a couple of databases in my setup. Yours will probably only show admin, config, and local.
Creating Collections and Documents
If we were using a relational database before we can start adding records, you’d need to do the following;
Create the database, typically using the “CREATE DATABASE …” command
Then, create the schema of the database
Define some indices
Then you can start adding records
In MongoDB, we don’t need to create a pre-defined schema because mongo databases do not enforce schemas. Schemas are optional; you may or may not want to use them.
If ever you will use schemas, they are not usually defined on the database level but are rather enforced at an application level. So we can just go ahead and create a record (document) right away.
mongo
> show databases
> use sampledb;
> db.employees.count();
> 0
The first line in the example list above shows how to start the MongoDB client. Assuming you’ve already started the mongod server process, you should see the chevron prompt.
The third line switches to a database named sample.db; but we don’t have a database by that name yet! No worries. In mongo, you can actually switch the context to a database even if it doesn’t exist — it will be created as soon as you add the first document.
The fourth line displays the number of documents on the current database. The db variable is an alias for the currently used database (sampledb); db.employees stand for a collection named employees on the sampledb database — which, of course, doesn’t exist yet.
The count() function shows zero because we haven’t added anything to it yet.
Inserting records in a mongo collection is a straightforward exercise; just use the insert() function and pass the document you want to insert as a JSON object.
In the examples above, we inserted two records in the employees collection — the collection and the database will be created as soon as you add a document.
Run the db.employees.count() command again to check if the inserts succeeded.
It should tell you that there are two records (documents) now.
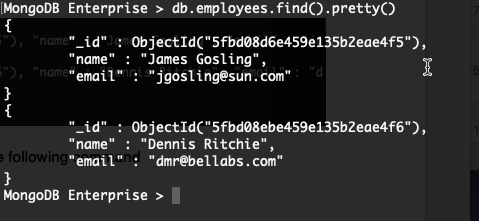
To display all documents in a collection, we can use the find() function, like this
db.employees.find()
If you want to prettify the results, you can use the following command
We won’t spend too much time in the mongo client since we won’t manage our data from the mongo CLI. We will do them on the application side.
Mongoose
If you’ve worked with an object-relational mapper before like hibernate, ActiveRecord, propel, eloquent, etc., those things do to SQL what mongoose does to mongoDB.
Mongoose is an ODM or an object document mapper.
Talking to MongoDB directly from our Express app is certainly possible, but Mongoose allows us to work with MongoDB with a lot more ease and from a higher abstraction, specifically, an object-oriented abstraction.
Before you can use it, you need to add it to the project via npm
npm install mongoose --save
Using Mongoose from Express
Before anything else, we need to require it, like this
The code above is a boilerplate on how to connect to a locally running MongoDB. It assumes that the database server and the node server are co-located on the same machine.
Performing the Queries
Before you can perform any query against the mongo database, you’ll need to create a mongoose schema and model; like this.
const Schema = mongoose.Schema

let employeeSchema = new Schema({
  id: {type: String},
  name: {type: String},
  email: {type:String}
})

let Employee = mongoose.model('Employee', employeeSchema)
List all Documents in a Collection
The model lets us work with the underlying MongoDB collections in an object-oriented way; for example, to list all the documents in the employee collection, we can write the query as follows;
The find() function of the model object takes an argument, which is a callback. When the query completes, the runtime invokes the callback and passes two-argument — an error object and the data.
If the error object is null, that means the query is completed without problems, and the data argument contains a list of all documents in the employee collection.
Find and List one Document
To find one document, we can use the findOne() function, as shown below.
app.get('/employee/:id', (req, res)=> {
let tempid = req.params.id let condition = {id: tempid}
Here, we’re using the employee id (which we got from the route parameter) as filter criteria. If the document is found and the query completes without problems, the data argument in the callback function will contain the document we’re looking for.
Create a Document
To create a document, we create an instance of the Employee model; then, we pass the new record as a JSON argument to the Employee constructor. After creating the object, we call the save() function, as shown below.
app.post('/employee', (req, res)=> {
let employee = new Employee({ id: req.body.id, name: req.body.name, email: req.body.email })
To delete a document, we use the deleteOne() function. The first argument of the function is an object that represents a criteria on which record to delete.
app.delete('/employee/:id', (req, res)=> {

  let tempid = req.params.id
  Employee.deleteOne({id: tempid}, (err)=> {
    if(err) { res.send(err) }
    else { res.send('updated the record')}
  })
})
In our example above, we get the employee id of the record we want to delete using the URL’s route parameter.
Updating a document is very similar to creating a document; in both cases, we pass a JSON object (which represents the document) in the body of the request object.
app.put('/employee', (req,res)=> {
let filter = {id: req.body.id} let update = { name: req.body.name, email: req.body.email }
We’ve done quite a bit on the server code. If you’ve been following along, it might be difficult to keep things straight. So, here’s the complete listing of server code.
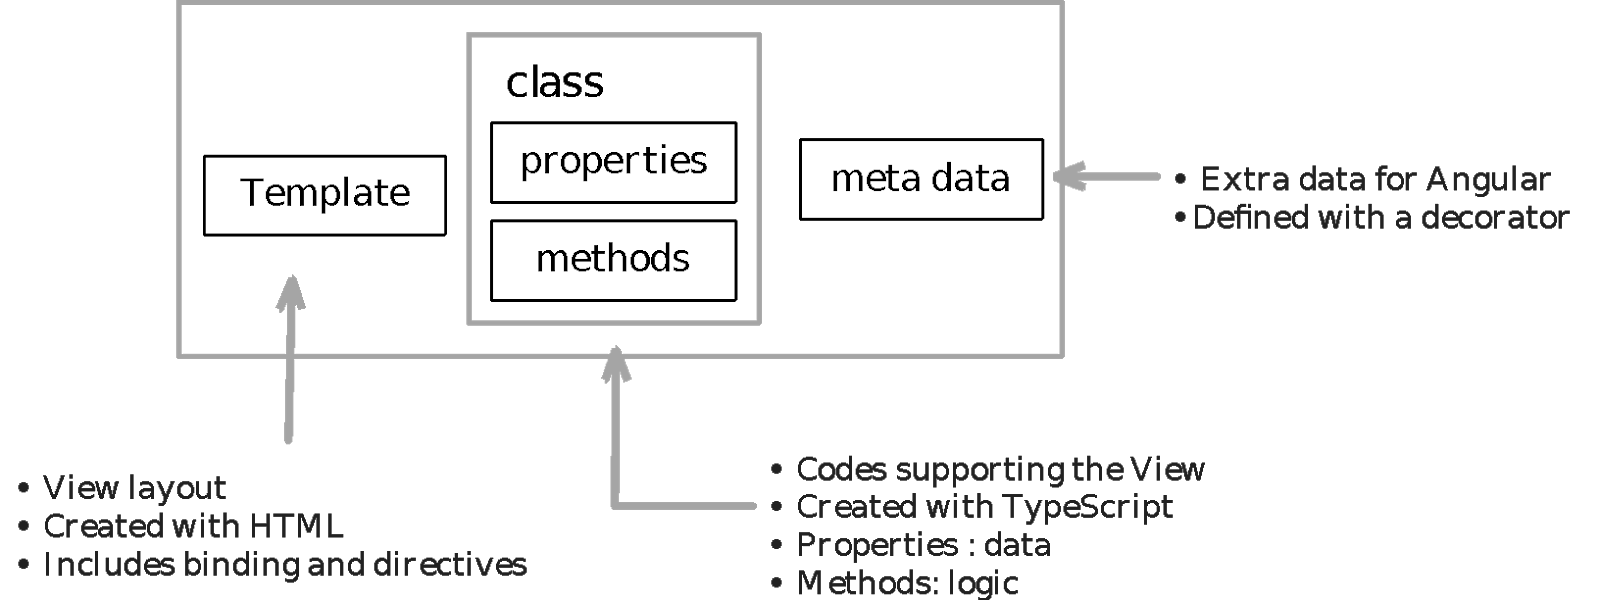
Angular is a SPA framework (single page application). It’s written in TypeScript — and it expects you to write in TypeScript as well. The basic building blocks of Angular are its components that it organizes into modules.
Components are the building blocks of Angular apps. An app is essentially just a collection of components that are arranged either side-by-side or nested in one another. A component has three major parts,
a class
metadata and
a template
Think of a component as something that contains application logic and that it controls a region of the user interface using HTML templates.
Not all components in Angular contains HTML data. Some do not. Components like services and Pipes do not have HTML data.
To create an Angular project, we need to get the Angular CLI. From a terminal or cmd window, type the following.
npm install -g @angular/CLI
That should install the Angular command-line utility
Now, we can create a project. On the same terminal window, type the following
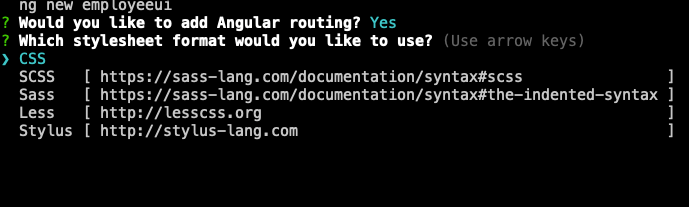
ng new employeeui
In the prompt that follows, it will ask you if you “would like to add Angular routing”, press Y for yes (we need routing in this project).
Next, you’ll be asked for your choice of styling. Choose CSS (to keep things simple). The Angular CLI will pull quite a few files from the npm repositories; it could take a while depending on your internet connection.
When all the files have been downloaded, switch to the newly created Angular project.
cd employeeui
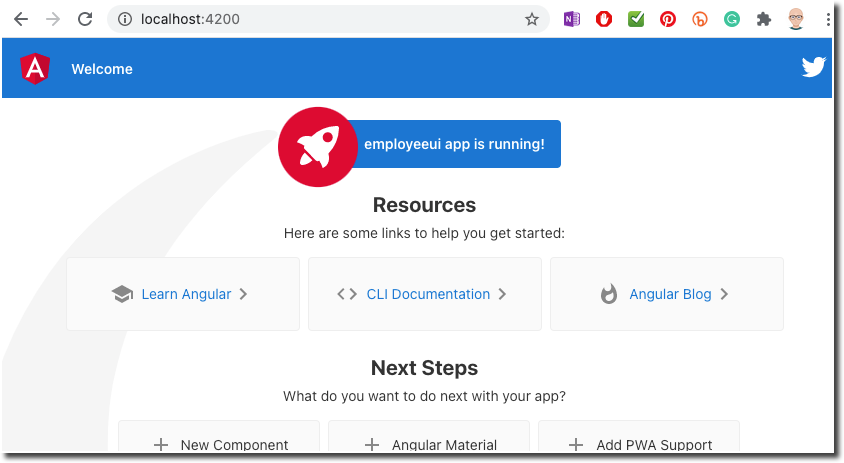
This is the directory where we will run all Angular CLI commands. At this point, the CLI built a boilerplate app for us. To run the app, we need to start the built-in webserver for Angular. From the command line, run the command
When we created the Angular project, a default component was created for us. The output of that default component is what we’re seeing (shown in the screenshot above).
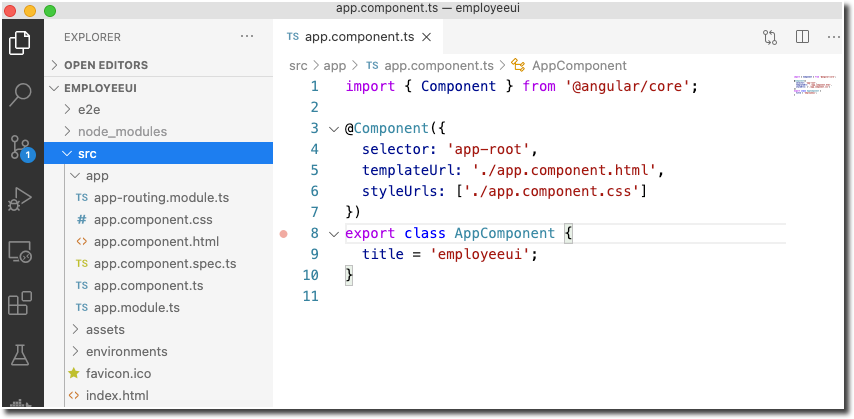
The default component’s files are under the src/app folder (shown below).
The most important files for us right now are the following;
app.component.ts – this contains the definition of our component. It has the model (TypeScript class) and the metadata
app.component.html – this contains the HTML template, which is largely responsible for the user interface
app.module.ts – The module file is what ties the project together. All component declarations and imports are in here. Whenever we add a component or import a library in the project, we have to update this file.
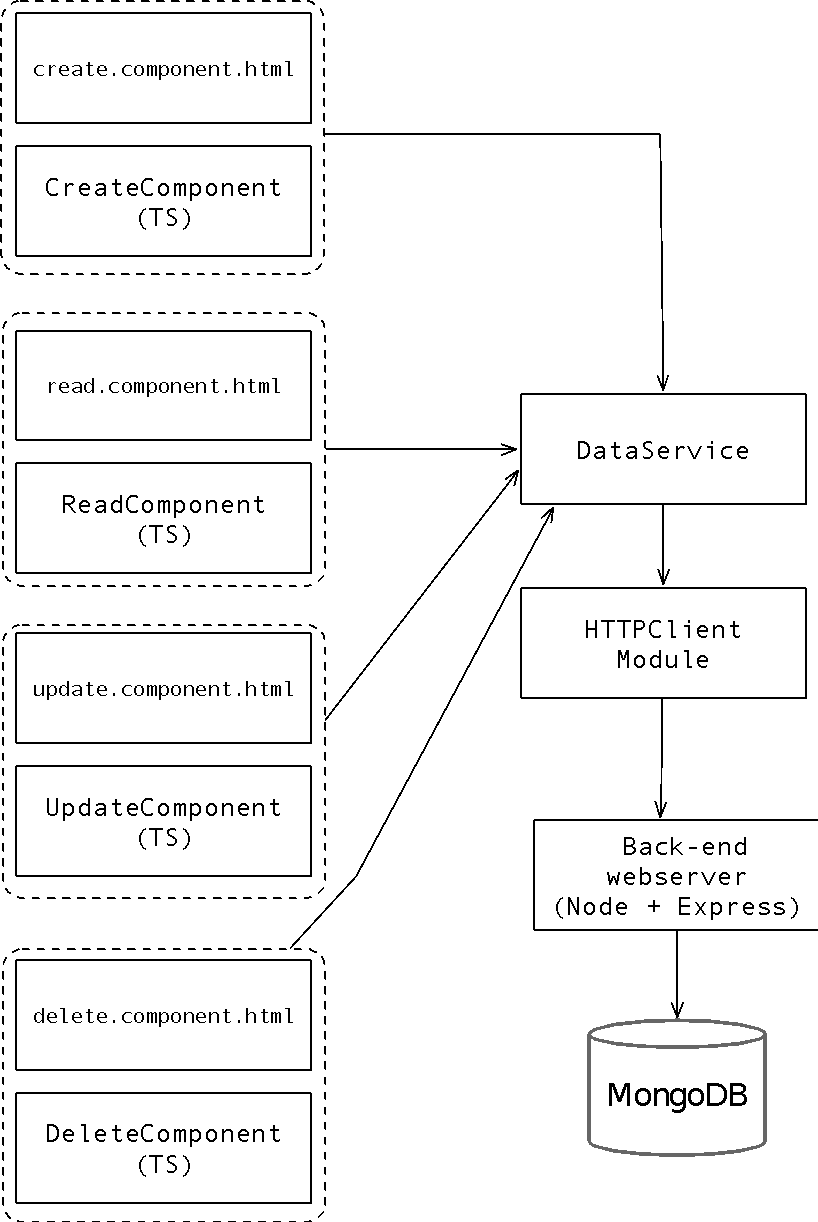
We won’t access the API endpoints from the components directly; instead, we will create a service that will take care of our HTTP transactions. The diagram below shows a more detailed architecture for our solution.
Looking at our architecture, we need the following components;
Create component – to facilitate the UI for adding an employee
Read component – So that we can browse the list of all employees
Update component – to facilitate the UI for editing employee information
Delete component – to delete a record
DataService component – this is where we’ll do all our HTTP transactions
Also, we need to import the HttpModule (for out HTTP requests) and the FormsModule (for creating and updating employee records).
Getting Additional Modules
We have to include two modules that we need for the app; these are;
HttpClientModule – we need this to fetch the data from our backend server
FormsModule – we need this because we will use Form elements in the solution
These two modules are not included by default; that’s why you need to declare them. To do that, edit the file app.module.ts and edit it to match the following code snippet
import { BrowserModule } from '@angular/platform-browser'; import { NgModule } from '@angular/core'; import { RouterModule} from '@angular/router'; import { HttpClientModule} from '@angular/common/http'; import { FormsModule } from '@angular/forms';
import { AppRoutingModule } from './app-routing.module'; import { AppComponent } from './app.component';
For the addEmployee() method, we expect to receive the employeeData parameter; this is a JSON object which will contain the id, name, and email for the employee.
It’s a POST call, so we expect the endpoint to parse the employeeData variable (which will be part of the HTTP request’s body.
Similarly, the updateEmployee() also expects a employeeData argument. The code for the updateEmployee() method is as follows;
Lastly, the code for the deleteEmployee() method is shown below;
deleteEmployee(id: String): Observable<any> { let url = `http://localhost:3000/employee/${id}`; console.log(url);
return this.http.delete(url);
}
The ID of the employee to delete is expected as an argument to the deleteEmployee() method. Unlike our POST and PUT requests, we will pass the employee ID as part of the HTTP querystring.
The complete code listing for the DataService class is shown below.
import { Injectable } from '@angular/core'; import { HttpClient } from '@angular/common/http'; import { Observable } from 'rxjs';
@Injectable({ providedIn: 'root' }) export class DataService {
Building the Read, Update, Create and Delete Components
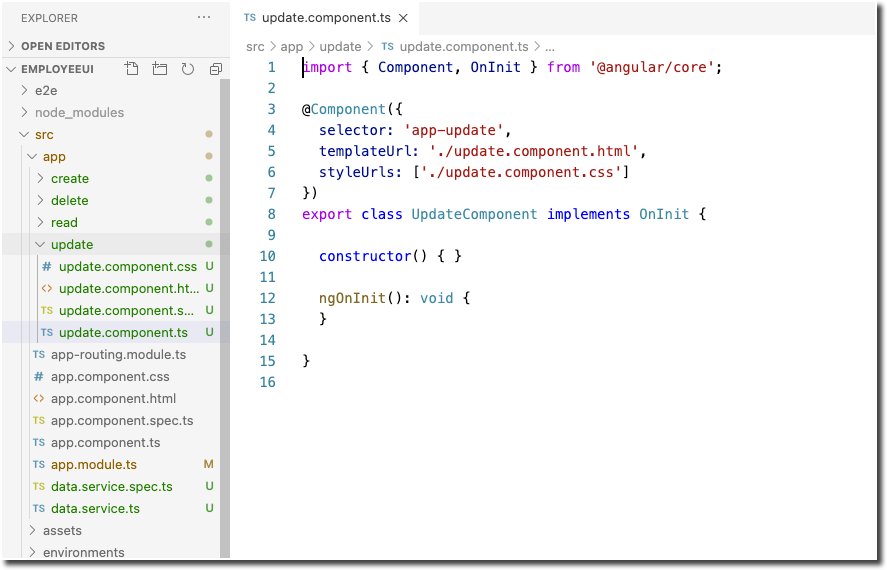
Now that we have our DataService component, we need to build the four UI components for our CRUD app. Like the DataService component, we will use the Angular CLI to generate these components. From the command line, run the following commands
ng g c read
ng g c create
ng g c update
ng g c delete
The project’s file structure should now look like the following
The create, delete, read, and update components are under the main app component folder.
Navigation and Styling
For out of the box styling of web pages, it’s hard to beat BootStrap; that’s what we’ll use for our project.
We can download BootStrap via npm and make it local to the project, but let’s take a more straightforward approach. We will simply reference BootStrap via a LINK element in our main HTML file.
Edit the app.component.html file to match the following snippet
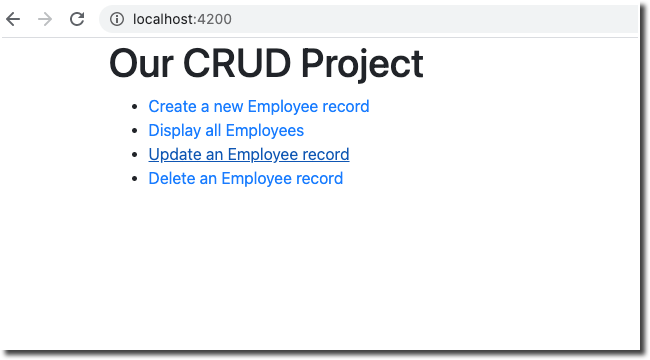
<div class="container"> <h1>Our CRUD Project</h1> <nav> <ul> <li> <a routerLink="/create">Create a new Employee record</a> </li> <li> <a routerLink="/read">Display all Employees</a> </li> <li> <a routerLink="/update">Update an Employee record</a> </li> <li> <a routerLink="/delete">Delete an Employee record</a> </li> </ul> </nav>
<router-outlet></router-outlet>
</div>
This sets up basic menu navigation for the main page. The routerLink element is unique to Angular; it uses routerLink instead of an href element to establish links between pages.
Next, we need to bind the CRUD components to the links (routerLink) so that when a link is clicked, the corresponding component shows up on the screen.
Edit app.module.ts to match the following. The changes you need to make are highlighted. These are the codes you need to bind the component to the links.
import { BrowserModule } from '@angular/platform-browser'; import { NgModule } from '@angular/core'; import { RouterModule} from '@angular/router'; import { HttpClientModule} from '@angular/common/http'; import { FormsModule } from '@angular/forms';
import { AppRoutingModule } from './app-routing.module'; import { AppComponent } from './app.component'; import { ReadComponent } from './read/read.component'; import { CreateComponent } from './create/create.component'; import { UpdateComponent } from './update/update.component'; import { DeleteComponent } from './delete/delete.component';
It’s a basic form. Most of the codes you see are BootStrap styling. The important part of this code is the form declaration
<form #form='ngForm' >
This line makes it an Angular form. The #form attribute isn’t a simple attribute. You can use that to reference the body of the form from the associated TypeScript class.
The other important line in this code is the declaration of the button
<button (click)=”addEmployee(form)”>Add</button>
The (click) directive makes the button event-aware. When it’s clicked, it will look for a method named addEmployee() in the associated TypeScript class (create.component.ts) and it will pass the form object as an argument to the addBook() method.
Now, edit the file create.component.ts to match the following code
import { Component, OnInit } from '@angular/core'; import {DataService} from '../data.service'; import { NgForm } from '@angular/forms';
The addEmployee() method takes in a form object (the one we passed from the HTML form), extracts the id, name, and email. Next, we save it to the formData variable; then, we pass formData to the addEmployee() method of the DataService component.
Remember that the DataService component method returns an Observable object instead of String objects. We will use the subscribe() method of the Observable to extract the String results.
The Read Screen
Edit the file read.component.ts so we can start our work on the ReadComponent class.
This class will fetch the data from our http://localhost:3000/employee endpoint, which effectively performs an Employee.find() command against our sample database and returns the resulting rows as a JSON object.
We will put all our codes on the ngOnInit() callback of the component so that when the component is activated, we perform the fetch.
The code below shows the complete listing for the ReadComponent.
import { Component, OnInit } from '@angular/core'; import {DataService} from '../data.service';
The <tr> element in the table’s body has an ngFor directive. This is a looping mechanism in Angular. It will go through all the elements in the employees array and then it will assign each element to the emp variable.
The employees array is coming from the ReadComponent class; remember that we declared that array as a member of ReadComponent class which makes it visible in the HTML template file.
We can then get to the id, name, and email properties using the emp variable, like this
emp.id – gets the ID field
emp.name – gets the name field
emp.email – gets the email field
To display the id, name, and email on the table’s cells, we use Angular’s template syntax — the double bracket.
The Update Screen
The update screen will be similar to our create screen, in fact, we’re going to use exactly the same template. The idea behind the update operation is as follows;
We enter an existing ID on the form
Enter whatever changes you want on the name and email info
Then, click Update
This is not how to handle updates on a real-world application; in there, you’d probably search for the record to update first, then fetch the record, then update the fields — we’re not doing that here.
We’re not doing a lot of validation here as well because we’d like to show the basic tech and the basic workflow only.
Open the template file update.component.html and modify it to match the following code.
The only change in the template is the label of the button. It reads “Update” instead of “Add”. The other change is the name of the method on the click handler; it reads “updateEmployee()” instead of “addEmployee().
Like the Create screen, the important parts of this file is the form declaration
<form #form='ngForm'>
and the button’s (click) handler. It’s the same techniques and principle that we used for the create screen.
Now, edit the file update.component.ts to match the following code.
import { Component, OnInit } from '@angular/core'; import {DataService} from '../data.service'; import { NgForm } from '@angular/forms';
Similar to the addEmployee() method of the Create screen, the updateEmployee() takes on a form object as a parameter. Inside the method, we extract the id, name, and email, save it to the variable formData and then send it to the DataService’s updateEmployee() method.
The Delete Screen
Open the file delete.component.html and edit it to match the following code.
As you can see, the deleteEmployee() method is almost similar to the updateEmployee() and addEmployee() methods; it takes a form object as a parameter, extracts the books value from it, and then calls the corresponding method on the DataService component.
This is the last piece of the solution. You should be able to piece them all up now. To test the solution, make sure that;
The mongod server is running
Node is up and running
ng serve is running
When it comes to the list of web development company India, Acodez ranks among the top companies. We offer all kinds of web design and Mobile app development services to our clients using the latest technologies. We are also a leading digital marketing company providing SEO, SMM, SEM, Inbound marketing services, etc at affordable prices We also offer Brandingsolutions to our clients. For further information, please contact us.
Looking for a good team
for your next project?
Contact us and we'll give you a preliminary free consultation on the web & mobile strategy that'd suit your needs best.
Jamsheer K, is the Tech Lead at Acodez. With his rich and hands-on experience in various technologies, his writing normally comes from his research and experience in mobile & web application development niche.